
Why do you need backup software?
It goes without saying, that multimedia files are big and important part of our everyday life. By the means of media, we keep our memories, have fun or perform our work. For this purpose, it’s better to have backups, as far as memory of our devices have limits, or it may become corrupted due to several reasons. For example, very often people damage their devices because of coffee. A spill from a cup of coffee can easily destroy whole your life! In order to make a backup you may use built-in tools such as iCloud or Time Machine. However, it’s not very reliable ones and it’s better to have a plan B that’s why we’ve prepared this overview of the best backup software for Mac OS. Check it right now!
Article’s Guide
iMazing
We have a simple and modern solution, that really can help you to backup your data fast and simple. iMazing has a wide range of functions: you can export photos from iPhone or iPad to computer, powered by Mac OS, and also from computer to iPhone/iPad. Moreover, this simple to use backup software for Mac gives you the opportunity to transfer data from iTunes, iCloud, to other Clouds: Samsung Cloud, Mi Cloud, etc.; to PC/Mac, external drives, flash and other USB drives. Just download it on your computer, and follow instructions below.
By clicking the button you agree with Privacy Policy, License Agreement, Refund Policy and Terms & Conditions. You will be directed to the downloading webpage.
You could share your photos without any limitations and manage all your cloud services from PC/Laptop. Moreover, iMazing allows you to manage your videos, music, and ringtones, download any data files to Smartphones with Android and iOS devices through wi-fi or cable. Also, you can share your media between Tablets with Android (or iOS) systems in one single app!
Click Get iMazing button on your PC or Laptop. Then, choose your language and install iMazing. You can follow the guide below to backup photos from iPhone to Mac OS without iTunes.
![]()
How to backup files with iMazing?
- Download and run iMazing installation
- Connect your External Hard Drive to PC/Laptop via USB cable
- Run iMazing icon from your desktop
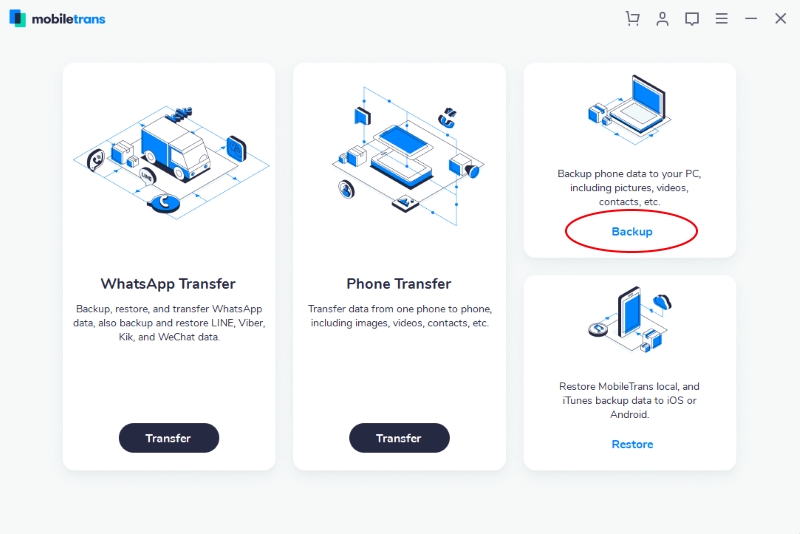
- Go to the “Backup” folder
- Connect your iPhone to your Mac via iPhone lighting cable
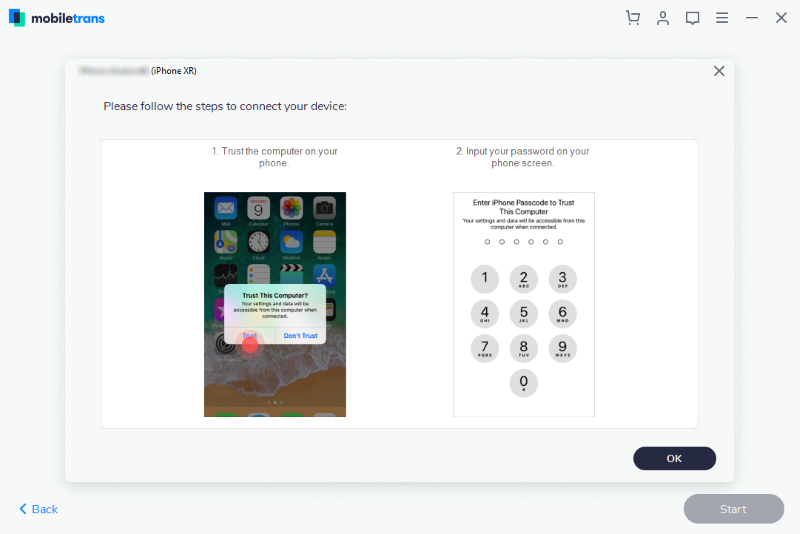
- iMazing will offer you to tap trust this computer – tap it on your iPhone, and press continue button on iMazing
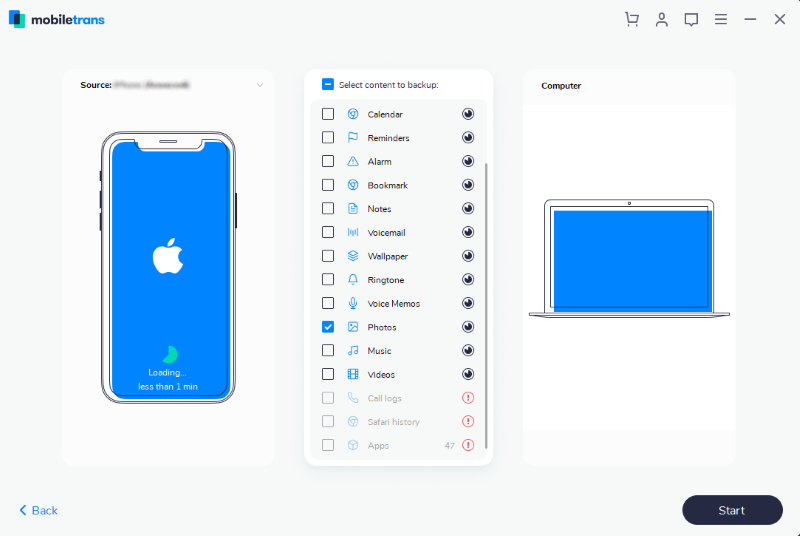
- Choose the category you want to transfer and then click the “Start” button
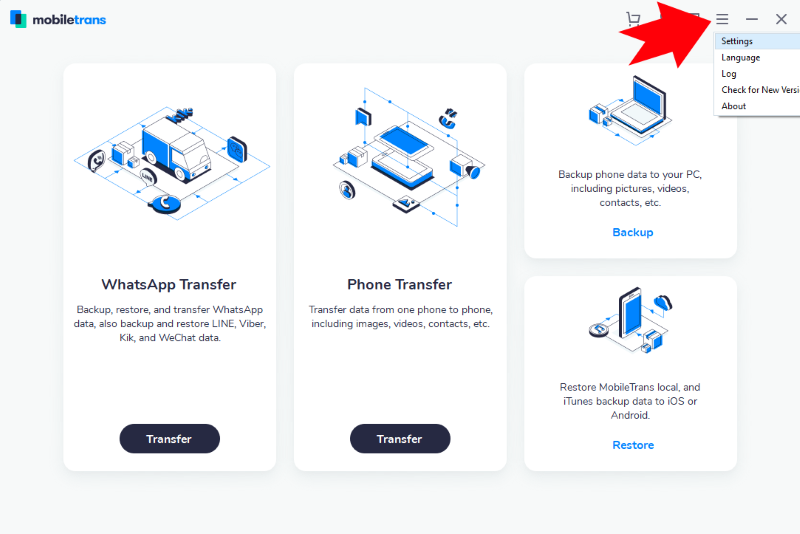
- If you want to change backup folder, go to the settings and change it.
![]()
Note: if you still have questions or something is not clear, write about it in the comments. We will help you in no time.
iMazing supports importing of Camera Roll photos, PhotoStream, Photo Libraries, photos from iTunes, photo albums, etc. When the transferring process will be finished, all your photos from iPhone will be saved in the selected folder. Note, that trial version allows to transfer no more than 30 files per day.
Acronis True Image 2020
The other good solution on how to backup your data is Acronis True Image 2020. This backup software for Mac offers you a great variety of opportunities. For example, this program is characterised by the fastest cloud recovery speed. You may be sure, that nothing will damage your files, as this program has a unique protection system, that prevents ransomware and malware attacks. You may be sure, that nothing will inerrupt the creation of backups as far as you can set a minimum power level or block backups on battery power. Moreover, it’s very easy to use! If you want to use Acronis Cloud, you’ll pay a yearly subscription ranging from £34.99 for 250GB to £69.99 for 1TB. Yearly plans include the cost of the software. However, you can also use only local backups and the price is £34.99 for a one time purchase.
How to backup files with Acronis True Image 2020?


- Launch Acronis True Image.
- Click Backup on the sidebar. If you already have any backups set up, click Add Backup to add a new backup task.
- Mac is pre-selected on the left, if not – select it.
- Specify a name for your backup.
- Click the backup destination icon on the right, and then select a destination for the backup.
- Select Acronis Cloud as a destination folder, or any local folder.
- Click the gear icon to set the options for the backup, including schedule, archive cleanup and others.
- You can select a schedule for creating regular backups of your system. If you select the option Do not schedule, then you will need to run the backup task manually every time using Back up button.
- Click Back up.
You need Acronis True Image Advanced ot Premium subscription to be able to back up to Acronis Cloud. If an external drive is plugged in, it will be detected automatically and will be displayed in the list of available backup destinations. Acronis True Image also detects NAS in the network and displays it in the list of available destinations as well. If the location is not listed, click Browse, and then select a location.
Get Backup Pro (v3)
Get Backup Pro (v3) is another good choice to create safe backups of your data. This simple to use backup software for Mac gives you an apportunity to make backups fast and safe. Get Backup Pro (v3) is characterised by the unique backup system, by the means of which backups of your data will take much less storage and it will reduce the size of resulting archives as much as up to 60%. By the means of this sotware you can encrypt your files in order to keep them safe from attacks of ransomware or malware viruses. Moreover, with the help of Get Backup Pro (v3) you can easily create a bootable backup of all your hard drive, by the means of which you can easily transer all your data on a new device!

How to backup files with Get Backup Pro (v3)?
Make sure that the backup tool is activated. Choose Window > Backup View or press Cmd-1. The APFS and Mac OS Extended file systems on the local destination drive lets you use its space more efficiently by creating incremental backups. If the local destination disk has a different file system, or if you want to save backups on a remote disk, you should choose the Disk Image option.
If your project includes files that are protected by the operating system, you will need to activate the Use administrator privileges check box in the project settings, and approve this with admin’s password in order to let the program access those file.
Step 1: Create a new backup project
Click the Plus button at the bottom of the project list. Then type in the project name.
Step 2: Set up the backup
As soon as you add a new project, the program will open the project settings. You can set up the project right away, or do this later. Note that you must select the backup destination drive and folder before running the project. Along with the destination, you should choose whether you want your data to be stored as original files and folders, or inside a disk image. In the first case, select Folder near the destination disk name. This is the default option. The two other options are Disk Image and Disk Image (Encrypted). To find out why you might want to use a disk image, read the Using Disk Images section.
Step 3: Add files and folders to the project
To add a file or folder to the project, use any of these ways:
By clicking the Apps Data+, you can choose a preset. Each of them adds user’s data related to one of listed apps. To delete an item from the list, select it and click the File- button below the list.
Step 4: Create a backup
To create a backup, click the Start button.
If you have activated scheduled creation of backups, the process will start automatically at the stated time.
If the When source and destination are mounted option is activated in the Properties dialog, the program can also start the process automatically when you connect a USB disk to the computer.
How to backup files with iCloud?
Nowadays, Apple promotes iCloud service, as a backup tool. This backup software is rather simple to backup your data, however, if you face the fact, that you are out of memory, you’d better choose our recommended solution. Moreover, the process will be canceled, if you run out of memory. So, we cannot characterize this method as a reliable one.
- Connect your device to a Wi-Fi network.
- Go to Settings, tap on the name of your device, and then choose iCloud.
- Choose iCloud Backup.
- Choose the Back Up Now option. Stay connected to your Wi-Fi network until the process completes.
Remember, there is a chance, that there is no enough available space in iCloud for the backup. You’d better check it beforehand.
How to backup photos without iTunes
This method is rather inconvenient and slow one, as it requires manipulations with your hard drives. Moreover, the process may become interrupted due to unforeseen reasons that’s why we don’t recommend you to use iTunes as a backup software. However, it can be suitable for you.
Manual solution for Mac OS
- Connect your iPhone/iPad Device To Your Mac/MacBook via lighting cable
- Launch Image Capture app
- Find your iPhone/iPad in the left bar and open it
- Choose all the photos on your iPhone/iPad and select destination for transfer
- Press Import
How to backup files using iTunes
This method is rather difficult to execute, however, it’s a reliable one.
- Connect your iPhone/iPad and Hard Drive to the computer
- Open Itunes app
- Click on the Device button
- In the opened window, choose your Photos
- Press Sync Photos, select folders you’d like to import and the destination folder
- Then press Apply and Done buttons
Note: if you’ve enabled iCloud photo synchronization, you will have to disable this function in the Settings
Finally, in this article we’ve mentioned all the best ways to backup your files on Mac OS. We hope that you’ve found a suitable backup software. If you’re out of time and it’s necessary for you to be sure, that everything will be completed perfectly, we strongly recommend you to use our automatic solution and install iMazing!
By clicking the button you agree with Privacy Policy and Terms & Conditions. You will be directed to the downloading webpage.