
What is Recovery?
![]()
Following the recently released Omerta Ransomware, Scarab developers team presented another cryptovirus entitled “Recovery“. There is not yet sufficient information to make a judgment about significant differences between the previous one. One has the feeling that developers just change the name of the virus. If you haven’t been acquainted with term “ransomware” yet, it’s a kind of virus that starts to encrypt targeted data after penetration. Once data is encoded, the user will not be able to use them. In so doing, hackers motivates users to buy decryptor. Still, you may remove Recovery Ransomware and decrypt .Recovery files without paying anything.

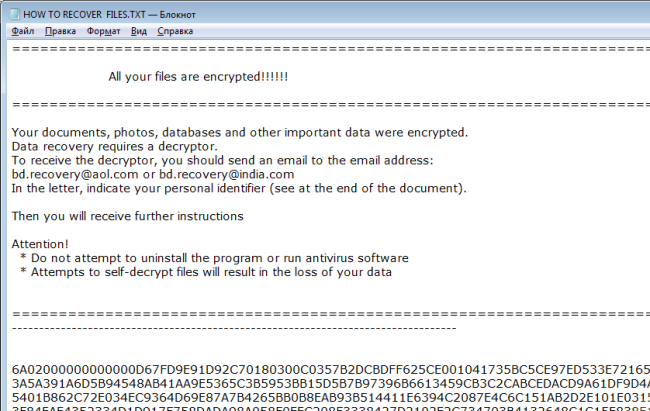
Recovery Ransomware encypts files using AES cipher adding .Recovery extension to each infected file. For example, myfamily.jpg turns into myfamily.Recovery. Users are also provided instructions to recover encrypted files in form of TXT file (HOW TO RECOVER FILES.TXT) which is placed on the desktop:
=======================================================================
All your files are encrypted!!!!!!
=======================================================================
Your documents, photos, databases and other important data were encrypted.
Data recovery requires a decryptor.
To receive the decryptor, you should send an email to the email address:
bd.recovery@aol.com or bd.recovery@india.com
In the letter, indicate your personal identifier (see at the end of the document).
Then you will receive further instructions
Attention!
* Do not attempt to uninstall the program or run antivirus software
* Attempts to self-decrypt files will result in the loss of your data
=======================================================================
———————————————————————————-
6A02000000000000***95EA03
———————————————————————————-
Here is used a typical scheme of all ransomware-type viruses – to intimidate victims and make them pay. The only differences between them are the ransom price and encryption method. In return, they are supposed to send you decryption key, however, as practice shows that cyber-criminals most often ignore people after payment is done. That’s why there is no need to contact them, it wouldn’t help. Still, you should focus on removing Recovery ransomware and then on decrypting files. You have 2 ways: automatic and manual, both solutions are presented here, but you should know that last one may require certain skills and knowledge while an automated removal tool can do this in just a few clicks.
How to remove Recovery from your computer?
You may try to use anti-malware tool to remove Recovery ransomware from your computer. Newly advanced ransomware detection technology is able to run an instant ransomware scan, which is perfect to protect your computer in case of a new ransomware attack.

How to decrypt files encrypted by Recovery?
Decrypt .Recovery files manually
Once you’ve removed the virus, you are probably thinking of recovering files from encryption. Let’s take a look at possible ways of decrypting your data.
Recover data with Data Recovery

- Download and install Data Recovery
- Select drives and folders with your files, then click Scan.
- Choose all the files in a folder, then press on Restore button.
- Manage export location.
Restore data with automated decryption tools
Unfortunately, due to the novelty of Recovery ransomware, there are no available automatic decryptors for this encryptor yet. Still, there is no need to invest in the malicious scheme by paying a ransom. You are able to recover files manually.
You can try to use one of these methods in order to restore your encrypted data manually.
Restore data with Windows Previous Versions
This feature is working on Windows Vista (not Home version), Windows 7 and later versions. Windows saves copies of files and folders which you can use to restore data on your computer. In order to restore data from Windows Backup, take following steps:
- Open My Computer and search for the folders you want to restore;
- Right-click on the folder and choose Restore previous versions option;
- The option will show you the list of all the previous copies of the folder;
- Select restore date and the option you need: Open, Copy and Restore.
Restore the system with System Restore
You can always try to use System Restore in order to roll back your system to its condition before infection infiltration. All the Windows versions include this option.
- Type restore in the Search tool;
- Click on the result;
- Choose restore point before the infection infiltration;
- Follow the on-screen instructions.
Restore data with Shadow Explorer
Shadow Explorer is an application that is able to provide you with Shadow Copies created by the Windows Volume Shadow Copy Service.
- Once you’ve downloaded this application, open a folder with it;
- Right-click on the file ShadowExplorer-0.9-portable and choose Extract all option;
- Run ShadowExplorerPortable.exe;
- Look at the left corner, there you can choose desired hard drive and latest restore option;
- On the right side you can see the list of files. Choose any file, right-click on it and select Export option.
Restore data with Recuva
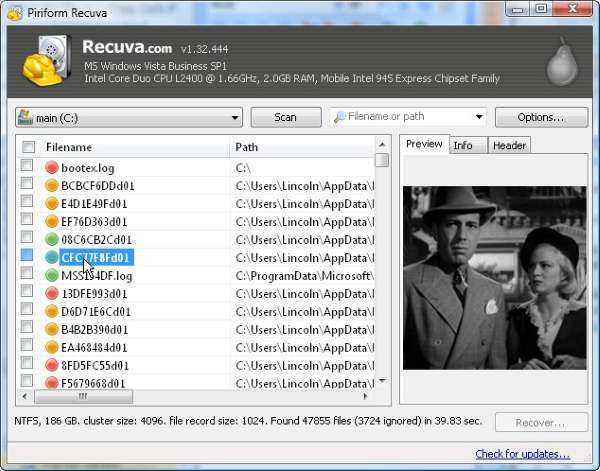
Recuva is a data recovery program for Windows, developed by Piriform. It is able to recover files that have been “permanently” deleted and marked by the operating system as free space.
- Once you’ve downloaded and installed this application, start it in Wizard mode: choose the Options button and then select Run Wizard;
- You will see Welcome to the Recuva Wizard page, choose Next;
- Open the File Type page and choose the type of data you need to recover, after select Next. If you don’t know what kind of data you are looking for, choose Other option;
- Choose the location of a search in the File Location window;
- In the Thank you window, select Start. After finishing searching process, Recuva will show you the results of search;
- Before recovering of the data, choose the Check Boxes near the file. You can see three types of colored dots. Green dot means that your chance to restore file is excellent. Orange one – chance to restore file is acceptable. And the red one shows you that it’s unlikely to happen;
- Select Recover option and choose the directory of the restored data.