
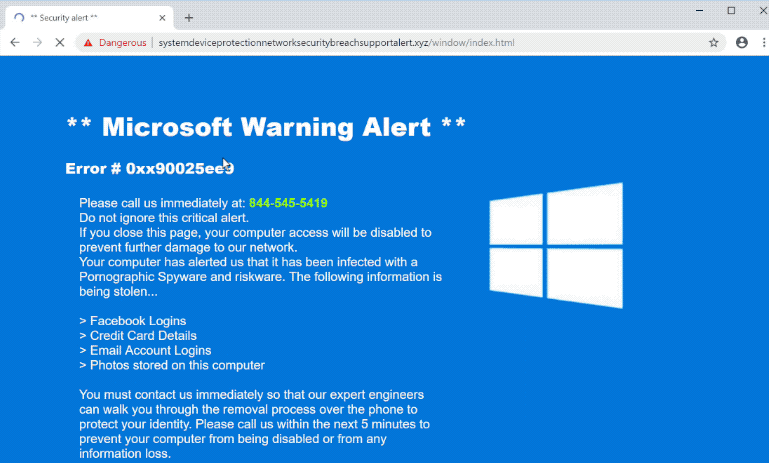
What is Error # 0xx90025ee9?
Error # 0xx90025ee9 may start popping up on your browser stating that your system is infected with different kinds of malware. If you are having this issue, you should know that it’s a fake error created to trick users into believing that they have a virus installed. In no case should contact them because you may become a victim of fraud and lose your money. Sure you can just ignore these pop-ups knowing it is a trap, however, to completely get rid of them, you need to remove malware that causes this pop-up. Mlaware like this often sneaks into the system unnoticed along with freeware and are automatically installed as an optional offer. Here you will find both automatic and manual methods to remove Error # 0xx90025ee9 pop-up. Just follow the instructions, described below.

How to remove Error # 0xx90025ee9 pop-up from your computer?
It scans your computer and detects various threats like Error # 0xx90025ee9 pop-up, then removes it with all of the related malicious files, folders and registry keys. After deep scanning of your system, it will easily find and delete Error # 0xx90025ee9 pop-up. Use this removal tool to get rid of Error # 0xx90025ee9 pop-up for FREE.


Norton 360 Antimalware – this program will help you to get rid of Error # 0xx90025ee9 pop-up. It can find malicious program that is corrupting your system and clean up junk files after removal.
How to remove Error # 0xx90025ee9 pop-up manually
Note: Removing Error # 0xx90025ee9 pop-up goes in Safe mode with networking.
How to enable Safe mode:
For Windows XP, Vista, 7
- Turn off your PC;
- Turn it on and immediately press F8 button;
- You’ll see Advanced Boot Options menu;
- Select Safe Mode with arrow buttons;
- In Safe Mode navigate to Control Panel, then choose Uninstall a program and remove “‘The proxy server is not responding’ error”.
For Windows 8/8.1 and 10
- Press the Win+R buttons, type msconfig in box and press Enter;
- Choose Boot tab, and click on Safe Boot check box;
- Select the type of Safe Mode: Minimal or Network;
- Press OK and reboot your PC;
- In Safe Mode navigate to Control Panel, then choose Uninstall a program and remove “‘The proxy server is not responding’ error”.
Step 1: Remove Error # 0xx90025ee9 pop-up from Control Panel
In order to get rid of Error # 0xx90025ee9 pop-up, first thing you need to do is to uninstall malicious program from your computer. When removing Error # 0xx90025ee9 pop-up, try to find suspicious recently installed programs and delete them too, as it’s pretty common that any malware comes with some other unwanted programs.
Windows XP:
- Select Start.
- Control Panel.
- Then choose Add or Remove Programs.
- Search for program related to Error # 0xx90025ee9 pop-up.
- Click Uninstall.
Windows 7/Windows Vista:
- Select Start.
- Then Control Panel.
- Choose Uninstall a Program.
- Find program related to Error # 0xx90025ee9 pop-up and choose Uninstall.
Windows 8/Windows 8.1:
- Open the Menu.
- Select Search.
- After that choose Apps.
- Next Control Panel.
- Then as in Windows 7, click Uninstall a Program under Programs.
- Find program related to Error # 0xx90025ee9 pop-up, select it and choose Uninstall.
Windows 10:
- Click on the Start button (or press the Windows key) to open the Start menu, then select Settings at the top.
- Choose App & features on the left menu.
- On the right side, find program related to Error # 0xx90025ee9 pop-up and select it, then click on the Uninstall button.
- Click on Uninstall to confirm.
Note: If you can’t find required program, sort programs by date in Control panel and search for suspicious recently installed programs.
Step 2: Remove Error # 0xx90025ee9 pop-up from browsers
Once you’ve uninstalled the application, remove Error # 0xx90025ee9 pop-up from your web browser. You need to search for recently-installed suspicious add-ons and extensions.
Google Chrome:
- Open Google Chrome
- Push Alt + F.
- Choose Tools.
- Select Extensions.
- Search for program related to Error # 0xx90025ee9 pop-up.
- Select the trash can icon to remove it.
Mozilla Firefox:
- Open Firefox.
- Push Shift + Ctrl + A.
- Select program related to Error # 0xx90025ee9 pop-up.
- Choose Disable or Remove option.
Internet Explorer:
- Open IE.
- Push Alt + T.
- Choose Manage Add-ons option.
- Click Toolbars and Extensions.
- Next select program related to Disable Error # 0xx90025ee9 pop-up.
- Choose More information link in the left-bottom corner.
- Click Remove button.
- If this button is grayed out – perform alternative steps.
Microsoft Edge:
- Launch Microsoft Edge
- Click the 3-dot icon at the top right corner
- Select Extensions
- Click the gear button near Error # 0xx90025ee9 pop-up or other extensions that look suspicious
- Select Remove
Step 3: Removing malicious link from your browser shortcuts
Sometimes even removing of malicious program from your computer and web browser can’t help. If you are still facing unknown webpage when you open your web browser, then you might have your browser shortcut changed. It’s pretty common trick that performs most of browser hijackers. They change your browser shortcut so that every time you open it you’ll see not your homepage, but some advertisement webpage. But this issue is quite simple to fix. The instruction stated below matches most of the browsers.
- Right-click on your browser shortcut, choose Properties.
- If you see a link to some website after .exe in the Target field, read on.
- Usually you are not able to delete a link from Target field, that’s why you need to click on the Open File Location button in this window.
- Once you’ve opened file location, select chrome.exe/firefox.exe/iexplore.exe.
- Right-click on this file and choose Sent to option, then Desktop (create shortcut).
- New shortcut will have no additional redirection links.
- Delete old infected shortcut. If you got one in your taskbar, delete it from there too.
- Now you have new and clear shortcut without redirection to unknown websites.
Step 4: Resetting your browser search and homepage settings
To be sure that there is nothing left behind, we recommend you to reset your browser. It will restore your browser settings to default.
Reset browser settings in Google Chrome:
- Click the Chrome menu (3 bar button) in the top right corner.
- Choose Settings.
- Click Show advanced settings.
- Go to Reset browser settings section.
- Click Reset browser settings.
- In the dialog that appears, click Reset.
Reset browser settings in Mozilla Firefox:
- Open Mozilla Firefox.
- Go to Help.
- Go to Troubleshooting information.
- Click Reset Firefox… button.
Reset browser settings in Internet Explorer:
- Open Internet Explorer.
- Click on the cogwheel in the right upper corner.
- Click Internet options.
- Got to Advanced tab.
- Click Reset button.
- Put a tick near Delete personal settings checkbox.
- Click Reset button.
Reset browser settings in Microsoft Edge:
- Launch Microsoft Edge
- Click the 3-dot button at the top right corner
- Select Settings
- Select Choose what to clear under the Clear browsing data category
- Highlight everything and click Clear
How to block malicious pop-ups in browsers
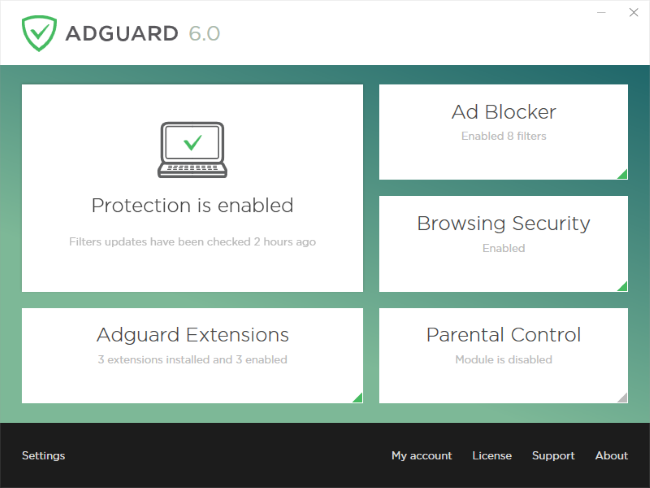
Adguard is a perfect application that will get rid your system of annoying ads, online tracking and will provide reliable protection from malware. The main advantage of Adguard is that you can easily block any types of ads whether legitimate they or not within your browser. Use it for FREE.
Adguard provides 14 days for trial use, to continue using the program, you will need to purchase the full version: $19.95 for a yearly subscription/ $49.95 for lifetime version. By clicking the button, you agree to EULA and Privacy Policy. Downloading will start automatically.